JSX

JSX stands for JavaScript XML, it allows us to write HTML elements in JavaScript and place them in the DOM without any createElement() or appendChild() methods. It makes writing HTML in React so much cleaner. The Code below is an example of some basic JSX.

import React from "react";

const javaScriptFunction = () => {
  return <p>This is a function with JSX!</p>;
};

const JSX = () => {
  return (
    <div>
      <h3>This is a h3 tag using JSX!</h3>
      <p>This is a p tag using JSX!</p>
      {javaScriptFunction()}
    </div>
  );
};

export default JSX;
React JSX

This is a h3 tag using JSX!

This is a p tag using JSX!

This is a function with JSX!

Now thanks to Babel which transpiles JSX into valid JavaScript for us we can write HTML in JavaScript in a much shorter and cleaner format. If we didn't have Babel and had to write all this out ourselves then the code would look like this.

import React from "react";

var javaScriptFunction = function javaScriptFunction() {
  return React.createElement("p", null, "This is a function with JSX!");
};

var WithoutJSX = function WithoutJSX() {
  return React.createElement(
    "div",
    null,
    React.createElement("h3", null, "This is a h3 tag using JSX!"),
    React.createElement("p", null, "This is a p tag using JSX!"),
    javaScriptFunction()
  );
};

export default WithoutJSX;
React JSX

This is a h3 tag using JSX!

This is a p tag using JSX!

This is a function with JSX!

Now that has the same output but thats really ugly code. Without JSX we have to use createElement() everytime we want to create a use an HTML tag. JSX makes our lives so much easier, you can test out your own JSX code and see what it would look like in plain Javascript over on Babels website. Babeljs.ioOne thing to always remember with JSX is that you must always wrap adjacent JSX elements in an enclosing tag.

import React from "react";

const javaScriptFunction = () => {
  return <p>This is a function with JSX!</p>;
};

const JSX = () => {
  return (
    //  The h3, p tags, and the function aren't wrapped with
    //  a parent element causing an error
      <h3>This is a h3 tag using JSX!</h3>
      <p>This is a p tag using JSX!</p>
      {javaScriptFunction()}
  );
};

export default JSX;
React JSX

Without the div tag to wrap the h1 and p tag you get a Syntax Error.

Now you this error mentions a new term, JSX Fragment. A Fragment lets you group a list of children like a div, but without adding extra nodes to the DOM. What does that mean? It means it tells the DOM that its child elements are grouped, but unlike the div tag it is completly ignored otherwise. The div tag will appear in the DOM, the React.Fragment won't.

import React from "react";

const JSXFragment = () => {
  return (
    <React.Fragment>
      <h3>
        These two elements are wrapped with a React Fragment so React won't
        throw an error
      </h3>
      <p>
        React Fragments wrap your JSX without effecting the output, no
        unnecessary div tags
      </p>
    </React.Fragment>
  );
};

export default JSXFragment;
React JSX

These two elements are wrapped with a React Fragment so React won't throw an error

React Fragments wrap your JSX without effecting the output, no unnecessary div tags

React Components

One of the most powerful features of React is its ability to break up UI into reusable Components. What does that mean? Well, let’s have a look at an example of a very basic App called MiniApp. MiniApp is made up of two components called MiniNavbar and MiniBlog.

import React from "react";
import MiniNavbar from "./MiniNavbar";
import MiniBlog from "./MiniBlog";
import "./miniApp.css";

const MiniApp = () => {
  return (
    <div id="mini-app">
      <h3>MiniApp</h3>
      <MiniNavbar />
      <MiniBlog />
    </div>
  );
};

export default MiniApp;
React JSX

MiniApp

Title: Why React is Better Than Angular

Article: React is better than Angular... Like way better You need Proof? I knew a guy who said he was gonna learn Angular... Next day a vending machine fell on him... True story

Here we see the code for the Navbar Component, its very simply but it contains the logic for the Navbar in one concise location. This makes it very easy to edit should we want to make changes to it later, maybe add a new button.

import React from "react";
import "./miniApp.css";

const MiniNavbar = () => {
  return (
    <div id="mini-navbar">
      <nav>
        NavBar
        <span> | </span>
        <button className="myButton">Home</button>
        <span> | </span>
        <button className="myButton">Blogs</button>
      </nav>
    </div>
  );
};

export default MiniNavbar;
React JSX

Here we have the MiniBlog component thats made up of two more sub-components, MiniBlogTitle and MiniBlogArticle.

import React from "react";
import MiniBlogArticle from "./MiniBlogArticle";
import MiniBlogTitle from "./MiniBlogTitle";

const MiniBlog = () => {
  return (
    <div>
      <MiniBlogTitle />
      <MiniBlogArticle />
    </div>
  );
};

export default MiniBlog;
React JSX

Title: Why React is Better Than Angular

Article: React is better than Angular... Like way better You need Proof? I knew a guy who said he was gonna learn Angular... Next day a vending machine fell on him... True story

MiniBlogTitle has the self contained title.

import React from "react";
import "./miniApp.css";

const MiniBlogTitle = () => {
  return (
    <div id="mini-title">
      <h3>Title: Why React is Better Than Angular</h3>
    </div>
  );
};

export default MiniBlogTitle;
React JSX

Title: Why React is Better Than Angular

MiniBlogArticle has the self contained article, thats the beauty of React. You can break down all the features of your app into their smaller pieces. Easy to read, easy to update and most importantly easy to reuse.

import React from "react";

const MiniBlogArticle = () => {
  return (
    <div>
      <p>
        <b>Article:</b> React is better than Angular... Like way better You need
        Proof? I knew a guy who said he was gonna learn Angular... Next day a
        vending machine fell on him... True story
      </p>
    </div>
  );
};

export default MiniBlogArticle;
React JSX

Article: React is better than Angular... Like way better You need Proof? I knew a guy who said he was gonna learn Angular... Next day a vending machine fell on him... True story

Functional vs Class Components

Functional Component

In react there are two types of Components, Functional and Class Components. They can produce the same output but they go about doing it in different ways. For example here we have a basic Functional Component returning a Font Awesome thumbs up icon.

import React from "react";
import { FontAwesomeIcon } from "@fortawesome/react-fontawesome";
import { Button } from "react-bootstrap";

const FunctionalComponent = () => {
  return (
    <Button>
      <FontAwesomeIcon icon={["far", "thumbs-up"]} size="5x" />
    </Button>
  );
};

export default FunctionalComponent;
React JSX

Output

Displays a static like button with no functionality

Class Component

Here we have a basic Class Component returning the same Font Awesome thumbs up icon.

import React from "react";
import { FontAwesomeIcon } from "@fortawesome/react-fontawesome";
import { Button } from "react-bootstrap";

class ClassComponent extends React.Component {
  render() {
    return (
      <Button>
        <FontAwesomeIcon icon={["far", "thumbs-up"]} size="5x" />
      </Button>
    );
  }
}

export default ClassComponent;
React JSX

Output

Displays a static like button with no functionality

State

Functional Component State (Hooks)

Now here's where the important difference between functional and class components comes in. The functional component handles state with the useState hook. The useState hook allows you to add State to a functional component. There's more hooks to learn about which can be found here. React Hooks

import React, { useState } from "react";
import { FontAwesomeIcon } from "@fortawesome/react-fontawesome";
import { Button } from "react-bootstrap";

const FunctionalComponentWithState = () => {
  // Here is where we declare the state using Hooks
  const [iconType, setIconType] = useState("far");

  const onClick = () => {
    if (iconType === "far") {
      setIconType("fas");
    } else if (iconType === "fas") {
      setIconType("far");
    }
  };

  return (
    <Button onClick={onClick}>
      <FontAwesomeIcon icon={[iconType, "thumbs-up"]} size="5x" />
    </Button>
  );
};

export default FunctionalComponentWithState;
React JSX

Output

Displays a clickable like button

Click Me!

Class Component State

With Class Based Components state is created using a Class Constructor that assigns initial this.state. In class based components you have to bind the this keyword to our current Component "ClassComponentWithState". Arrow functions bind the this keyword to the Component. If you don't bind this with an arrow function you'll get this error

import React from "react";
import { FontAwesomeIcon } from "@fortawesome/react-fontawesome";
import { Button } from "react-bootstrap";

class ClassComponentWithStateConstructor extends React.Component {
  // Here is where we declare the state with a class constructor
  constructor(props) {
    super(props);
    this.state = { iconType: "far" };
  }

  // Binding this.state with an arrow function
  onClick = () => {
    if (this.state.iconType === "far") {
      this.setState({ iconType: "fas" });
    } else if (this.state.iconType === "fas") {
      this.setState({ iconType: "far" });
    }
  };

  render() {
    return (
      <Button onClick={this.onClick}>
        <FontAwesomeIcon icon={[this.state.iconType, "thumbs-up"]} size="5x" />
      </Button>
    );
  }
}

export default ClassComponentWithStateConstructor;
React JSX

Output

Displays a clickable like button

Click Me!

Class Component State With Babels Help

  The following code is equal to the code above but we're relying on BABEL to create the constructor behind the scenes for us. This article explains it in more detail.

import React from "react";
import { FontAwesomeIcon } from "@fortawesome/react-fontawesome";
import { Button } from "react-bootstrap";

class ClassComponentWithState extends React.Component {
  // Here is where we declare the state Babel creates the constructor for us
  state = { iconType: "far" };

  // Binding this.state with an arrow function
  onClick = () => {
    if (this.state.iconType === "far") {
      this.setState({ iconType: "fas" });
    } else if (this.state.iconType === "fas") {
      this.setState({ iconType: "far" });
    }
  };

  render() {
    return (
      <Button onClick={this.onClick}>
        <FontAwesomeIcon icon={[this.state.iconType, "thumbs-up"]} size="5x" />
      </Button>
    );
  }
}

export default ClassComponentWithState;
React JSX

Output

Displays a clickable like button

Click Me!

Props

"Props" (which stands for properties) are arguments passed into React components. In the example below we have a Parent Component which passes a prop called name to its child components.

import React from "react";
import ChildComponent from "./ChildComponent";

const ParentComponent = () => {
  return (
    <div>
      <h1>Vending Machine</h1>
      <ChildComponent name="Coca-Cola" />
      <ChildComponent name="Pepsi" />
      <ChildComponent name="Mountain Dew" />
      <ChildComponent name="Dr Pepper" />
    </div>
  );
};

export default ParentComponent;
React JSX

With a functional component you reference your props by passing the props argument and in our case referencing our name prop props.name

import React from "react";

const ChildComponent = (props) => {
  return (
    <div>
      <input type="radio" name="soda" />
      <label for="soda">{props.name}</label>
      <br />
    </div>
  );
};

export default ChildComponent;
React JSX

Vending Machine


With Class based Components very little changes. You still pass props down from the parent in the exact same way.

import React from "react";
import ClassChildComponent from "./ClassChildComponent";

class ClassParentComponent extends React.Component {
  render() {
    return (
      <div>
        <h1>Vending Machine</h1>
        <ClassChildComponent name="Coca-Cola" />
        <ClassChildComponent name="Pepsi" />
        <ClassChildComponent name="Mountain Dew" />
        <ClassChildComponent name="Dr Pepper" />
      </div>
    );
  }
}

export default ClassParentComponent;
React JSX

In the Child Componet the only difference is you reference props prefixed with the this keyword.

import React from "react";

class ClassChildComponent extends React.Component {
  render() {
    return (
      <div>
        <input type="radio" name="soda" />
        <label for="soda">{this.props.name}</label>
        <br />
      </div>
    );
  }
}

export default ClassChildComponent;
React JSX

Events

Events with Functional Components

Events in React like the OnClick event are written in camelCase: onClick() instead of onclick().
React event handlers are written inside curly braces. With a Functional Component you define the the event handler as a method inside the component above the return statement. You then then call the event handler inside the curly braces.

import React from "react";

const EventsFunctionalExample = () => {
  const sayHello = () => {
    alert("Hello!");
  };
  return <button onClick={sayHello}>Click To Say Hello</button>;
};

export default EventsFunctionalExample;
React JSX

Events with Class Components

With a Class Component its very similar. Except you define the method using an IFFE (Immediately Invoked Function Expression) inside the component above the render method. You then call it inside the curcly braces but prefixing it with the this keyword.

import React from "react";

class EventsClassExample extends React.Component {
  sayHello() {
    alert("Hello!");
  }
  render() {
    return <button onClick={this.sayHello}>Click To Say Hello</button>;
  }
}

export default EventsClassExample;
React JSX

LifeCycle Methods

ComponentDidMount()

The componentDidMount() lifecycle method is called after a component is rendered. It is the most commonly used lifecycle method because it allows you to run functions the moment the component has finished rendering. In the example below componentDidMount() is used to call the PrismJS library which highlights the code below so it looks like a text editor.

import React from "react";
import Prism from "prismjs";
import { Row, Col } from "react-bootstrap";

class Mounting extends React.Component {
  componentDidMount() {
    Prism.highlightAll();
  }
  render() {
    return (
      <Row>
        <Col lg={10}>
          <pre>
            <code className="language-jsx line-numbers">{this.props.code}</code>
          </pre>
        </Col>
      </Row>
    );
  }
}

export default Mounting;
React JSX

Virtual DOM

Real DOM

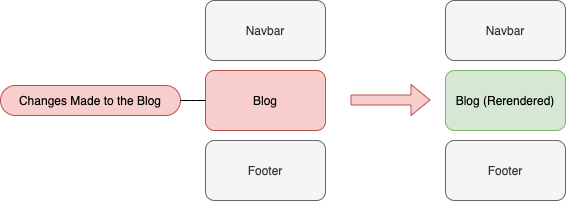
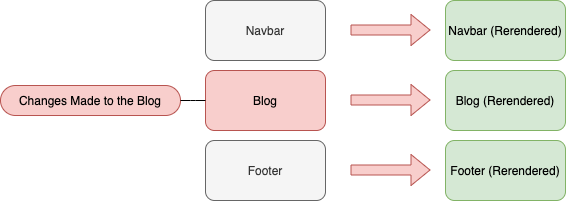
The DOM aka the Document Object Model is an abstraction of HTML code. Elements of HTML become nodes in the DOM. The modern web app is made of thousands of HTML elements so that means thousands of nodes in the DOM. The downside of the DOM is when one node is updated they all update. This can be extremly slow depending on how many nodes need to update in your app.

Real DOM

Virtual DOM

So we dont want all our nodes updating when only one has been changed. Thats where the Virtual DOM comes in, the Virtual DOM creates a snapshot of the Real DOM. This allows React to compare the Virtual DOM snapshot with the Real DOM to see whats changed, this process is called 'diffing'. It then only updates the node that has changed.

Virtual DOM